Experimenting with asyncio on a Raspberry Pi
In a previous post, I described how I built a LEGO Macintosh Classic with a Raspberry Pi and e-paper display.
For testing purpose I installed the clock demo which is part of the Embedded Artists repository. Of course I wanted to do more than displaying the time on this little box. I also wanted to take advantage of the button I had integrated.
One idea was to create a small web server so that I could receive and display messages. The application would basically:
display the time (every minute)
when receiving a message, stop the clock and display the message
when the button is pressed, start the clock again

I don't know about you, but this really makes me think event loop! I learnt asynchronous programming with Dave Peticolas Twisted Introduction a few years ago. If you are not familiar with asynchronous programming, I really recommend it. I wrote a few applications using Twisted but I haven't had the opportunity to use asyncio yet. Here is a very good occasion!
asyncio
REST API using aiohttp
There are already several asyncio web frameworks to build an HTTP server. I decided to go with aiohttp which is kind of the default one.
Using this tutorial I wrote a simple REST API using aiohttp. It uses JSON Web Tokens which is something else I have been wanted to try.
The API has only 3 endpoints:
def setup_routes(app):
    app.router.add_get('/', index)
    app.router.add_post('/login', login)
    app.router.add_post('/messages', post_message)
/ to check that our token is valid
/login to login
/messages to post messages
async def login(request):
    config = request.app['config']
    data = await request.json()
    try:
        user = data['username']
        passwd = data['password']
    except KeyError:
        return web.HTTPBadRequest(reason='Invalid arguments')
    # We have only one user hard-coded in the config file...
    if user != config['username'] or passwd != config['password']:
        return web.HTTPBadRequest(reason='Invalid credentials')
    payload = {
        'user_id': 1,
        'exp': datetime.datetime.utcnow() + datetime.timedelta(seconds=config['jwt_exp_delta_seconds'])
    }
    jwt_token = jwt.encode(payload, config['jwt_secret'], config['jwt_algorithm'])
    logger.debug(f'JWT token created for {user}')
    return web.json_response({'token': jwt_token.decode('utf-8')})


@login_required
async def post_message(request):
    if request.content_type != 'application/json':
        return web.HTTPBadRequest()
    data = await request.json()
    try:
        message = data['message']
    except KeyError:
        return web.HTTPBadRequest()
    logger.debug(f'Message received from {request.user}: {message}')
    return web.json_response({'message': message}, status=201)


@login_required
async def index(request):
    return web.json_response({'message': 'Welcome to LegoMac {}!'.format(request.user)})
Raspberry Pi GPIO and asyncio
The default Python package to control the Raspberry Pi GPIO seems to be RPi.GPIO. That's at least what is used in the ImageDemoButton.py from Embedded Artists.
An alternative is the pigpio library which provides a daemon to access the Raspberry Pi GPIO via a pipe or socket interface. And someone (Pierre Rust) already created an aysncio based Python client for the pigpio daemon: apigpio.
Exactly what I needed! It's basically a (incomplete) port of the original Python client provided with pigpio, but far sufficient for my need. I just want to get a notification when pressing the button on top of the screen.
There is an example how to achieve that: gpio_notification.py.
E-paper display and asyncio
The last remaining piece is to make the e-paper display play nicely with asyncio.
The EPD driver uses the fuse library. It allows the display to be represented as a virtual directory of files. So sending a command consists of writing to a file.
There is a library to add file support to asyncio: aiofiles. The only thing I had to do was basically to wrap the file IO in EPD.py with aiofiles:
async def _command(self, c):
    async with aiofiles.open(os.path.join(self._epd_path, 'command'), 'wb') as f:
        await f.write(c)
You can't use await in a class __init__ method. So following some recommendations from stackoverflow, I used the factory pattern and moved the actions requiring some IO to a classmethod:
@classmethod
async def create(cls, *args, **kwargs):
    self = EPD(*args, **kwargs)
    async with aiofiles.open(os.path.join(self._epd_path, 'version')) as f:
        version = await f.readline()
        self._version = version.rstrip('\n')
    async with aiofiles.open(os.path.join(self._epd_path, 'panel')) as f:
        line = await f.readline()
        m = self.PANEL_RE.match(line.rstrip('\n'))
        if m is None:
            raise EPDError('invalid panel string')
        ...
To create an instance of the EPD class, use:
epd = await EPD.create([path='/path/to/epd'], [auto=boolean])
Putting everything together with aiohttp
Running the clock as a background task
For the clock, I adapted the clock demo from Embedded Artists repository.
As described in aiohttp documentation I created a background task to display the clock every minute:
async def display_clock(app):
    """Background task to display clock every minute"""
    clock = Clock(app['epd'])
    first_start = True
    try:
        while True:
            while True:
                now = datetime.datetime.today()
                if now.second == 0 or first_start:
                    first_start = False
                    break
                await asyncio.sleep(0.5)
            logger.debug('display clock')
            await clock.display(now)
    except asyncio.CancelledError:
        logger.debug('display clock cancel')


async def start_background_tasks(app):
     app['epd'] = await EPD.create(auto=True)
     app['clock'] = app.loop.create_task(display_clock(app))


async def cleanup_background_tasks(app):
    app['clock'].cancel()
    await app['clock']


def init_app():
    """Create and return the aiohttp Application object"""
    app = web.Application()
    app.on_startup.append(start_background_tasks)
    app.on_cleanup.append(cleanup_background_tasks)
    ...
Stop the clock and display a message
When receiving a message, I first cancel the clock background task and send the messages to the e-paper display using ensure_future so that I can return a json response without having to wait for the message to be displayed as it takes about 5 seconds:
@login_required
async def post_message(request):
    if request.content_type != 'application/json':
        return web.HTTPBadRequest()
    data = await request.json()
    try:
        message = data['message']
    except KeyError:
        return web.HTTPBadRequest()
    # cancel the display clock
    request.app['clock'].cancel()
    logger.debug(f'Message received from {request.user}: {message}')
    now = datetime.datetime.now(request.app['timezone'])
    helpers.ensure_future(request.app['epd'].display_message(message, request.user, now))
    return web.json_response({'message': message}, status=201)
Running on the Pi
You might have noticed that I used some syntax that is Python 3.6 only. I don't really see myself using something else when starting a new project today :-) There are so many new things (like f-strings) that make your programs look cleaner.
On raspbian, if you install Python 3, you get 3.4... So how do you get Python 3.6 on a Raspberry Pi?
On desktop/server I usually use conda. It makes it so easy to install the Python version you want and many dependencies. There are no official installer for the armv6 architecture but I found berryconda which is a conda based distribution for the Raspberry Pi! Really nice!
Another alternative is to use docker. There are official arm32v6 images based on alpine and some from resin.io.
I could have gone with berryconda, but there's one thing I wanted as well. I'll have to open the HTTP server to the outside world meaning I need HTTPS. As mentionned in another post, traefik makes that very easy if you use docker. So that's what I chose.
I created 3 containers:
traefik
pigpiod
aiolegomac
traefik
There are no official Traefik docker images for arm yet, but an issue is currently opened. So it should arrive soon!
In the meantime I created my own:
FROM arm32v6/alpine:3.6

RUN apk --update upgrade \
  && apk --no-cache --no-progress add ca-certificates \
  && apk add openssl \
  && rm -rf /var/cache/apk/*

RUN wget -O /usr/local/bin/traefik https://github.com/containous/traefik/releases/download/v1.3.3/traefik_linux-arm \
  && chmod a+x /usr/local/bin/traefik

ENTRYPOINT ["/usr/local/bin/traefik"]
pigpiod
For pigpiod, I first created an image based on arm32v6/alpine but I noticed I couldn't send a SIGTERM to the daemon to stop it properly... I'm not sure why. Alpine being based on musl instead of glibc might be the problem. Here is the Dockerfile I tried:
FROM arm32v6/alpine:3.6

RUN apk add --no-cache --virtual .build-deps \
  gcc \
  make \
  musl-dev \
  tar \
  && wget -O /tmp/pigpio.tar abyz.co.uk/rpi/pigpio/pigpio.tar \
  && tar -xf /tmp/pigpio.tar -C /tmp \
  && sed -i "/ldconfig/d" /tmp/PIGPIO/Makefile \
  && make -C /tmp/PIGPIO \
  && make -C /tmp/PIGPIO install \
  && rm -rf /tmp/PIGPIO /tmp/pigpio.tar \
  && apk del .build-deps

EXPOSE 8888

ENTRYPOINT ["/usr/local/bin/pigpiod", "-g"]
I even tried using tini as entrypoint without luck. So if someone as the explanation, please share it in the comments.
I tried with resin/rpi-raspbian image and I got it working properly right away:
FROM resin/rpi-raspbian:jessie

RUN apt-get update \
  && apt-get install -y \
     make \
     gcc \
     libc6-dev \
  && apt-get clean \
  && rm -rf /var/lib/apt/lists/*

RUN curl -o /tmp/pigpio.tar abyz.co.uk/rpi/pigpio/pigpio.tar \
  && tar -xf /tmp/pigpio.tar -C /tmp \
  && make -C /tmp/PIGPIO \
  && make -C /tmp/PIGPIO install \
  && rm -rf /tmp/pigpio.tar /tmp/PIGPIO

EXPOSE 8888

ENTRYPOINT ["/usr/local/bin/pigpiod", "-g"]
Note that the container has to run in privileged mode to access the GPIO.
aiolegomac
For the main application, the Dockerfile is quite standard for a Python application:
FROM resin/raspberry-pi-python:3.6

RUN apt-get update \
  && apt-get install -y \
     fonts-liberation \
     fonts-dejavu  \
     libjpeg-dev \
     libfreetype6-dev \
     libtiff5-dev \
     liblcms2-dev \
     libwebp-dev \
     zlib1g-dev \
     libyaml-0-2 \
  && apt-get autoremove \
  && apt-get clean \
  && rm -rf /var/lib/apt/lists/*

WORKDIR /app

COPY requirements.txt /app/requirements.txt
RUN python -m venv /opt/legomac \
  && /opt/legomac/bin/pip install -r requirements.txt

COPY . /app

ENTRYPOINT ["/opt/legomac/bin/python"]
CMD ["run.py"]
What about the EPD driver? As it uses libfuse to represent the e-paper display as a virtual directory of files, the easiest was to install it on the host and to mount it as a volume inside the docker container.
Deployment
To install all that on the Pi, I wrote a small Ansible playbook.
Configure the Pi as described in my previous post.
-
Clone the playbook:
$ git clone https://github.com/beenje/legomac.git
$ cd legomac
-
Create a file host_vars/legomac with your variables (assuming the hostname of the Pi is legomac):
aiolegomac_hostname: myhost.example.com
aiolegomac_username: john
aiolegomac_password: mypassword
aiolegomac_jwt_secret: secret
traefik_letsencrypt_email: youremail@example.com
traefik_letsencrypt_production: true
-
Run the playbook:
$ ansible-playbook -i hosts -k playbook.yml
This will install docker and the EPD driver, download the aiolegomac repository, build the 3 docker images and start everything.
Building the main application docker image on a Raspberry Pi Zero takes quite some time. So be patient :-) Just go and do something else.
When the full playbook is complete (it took about 55 minutes for me), you'll have a server with HTTPS support (thanks to Let's Encrypt) running on the Pi. It's displaying the clock every minute and you can send messages to it!
Client
HTTPie
To test the server you can of course use curl but I really like HTTPie. It's much more user friendly.
Let's try to access our new server:
$ http GET https://myhost.example.com
HTTP/1.1 401 Unauthorized
Content-Length: 25
Content-Type: application/json; charset=utf-8
Date: Sun, 16 Jul 2017 06:22:42 GMT
Server: Python/3.6 aiohttp/2.2.3

{
    "error": "Unauthorized"
}
Good, we need to login:
$ http POST https://myhost.example.com/login username=john password=foo
HTTP/1.1 400 Bad Request
Content-Length: 32
Content-Type: application/json; charset=utf-8
Date: Sun, 16 Jul 2017 06:18:39 GMT
Server: Python/3.6 aiohttp/2.2.3

{
    "error": "Invalid credentials"
}
Oops, wrong password:
$ http POST https://myhost.example.com/login username=john password='mypassword'
HTTP/1.1 200 OK
Content-Length: 134
Content-Type: application/json; charset=utf-8
Date: Sun, 16 Jul 2017 06:21:14 GMT
Server: Python/3.6 aiohttp/2.2.3

{
    "token": "eyK0eXAiOiJRV5QiLCJhbGciOiJIUzI1NiJ9.eyJ1c3VyX2lkIjoxLCJleHAiOjE1MDB5MTIwOTh9.hECnj4u2mxvZ2r8IEC-db1T-eKTplM4kWJKZoHhtLxQ"
}
We got a token that we can use:
$ http GET https://myhost.example.com 'Authorization: eyK0eXAiOiJRV5QiLCJhbGciOiJIUzI1NiJ9.eyJ1c3VyX2lkIjoxLCJleHAiOjE1MDB5MTIwOTh9.hECnj4u2mxvZ2r8IEC-db1T-eKTplM4kWJKZoHhtLxQ'
HTTP/1.1 200 OK
Content-Length: 43
Content-Type: application/json; charset=utf-8
Date: Sun, 16 Jul 2017 06:22:25 GMT
Server: Python/3.6 aiohttp/2.2.3

{
    "message": "Welcome to LegoMac john!"
}
Authentication is working, so we can send a message:
$ http POST https://myhost.example.com/messages message='Hello World!' 'Authorization: eyK0eXAiOiJRV5QiLCJhbGciOiJIUzI1NiJ9.eyJ1c3VyX2lkIjoxLCJleHAiOjE1MDB5MTIwOTh9.hECnj4u2mxvZ2r8IEC-db1T-eKTplM4kWJKZoHhtLxQ'
HTTP/1.1 201 Created
Content-Length: 27
Content-Type: application/json; charset=utf-8
Date: Sun, 16 Jul 2017 06:23:46 GMT
Server: Python/3.6 aiohttp/2.2.3

{
    "message": "Hello World!"
}
Message sent! HTTPie is nice for testing, but we can make a small script to easily send messages from the command line.
requests
requests is of course the HTTP library to use in Python.
So let's write a small script to send messages to our server. We'll store the server url and username to use in a small yaml configuration file. If we don't have a token yet or if the saved one is no longer valid, the script will retrieve one after prompting us for a password. The token is saved in the configuration file for later use.
The following script could be improved with some nicer error messages by catching exceptions. But it does the job:
import os
import click
import requests
import yaml


def get_config(filename):
    with open(filename) as f:
        config = yaml.load(f)
    return config


def save_config(filename, config):
    with open(filename, 'w') as f:
        yaml.dump(config, f, default_flow_style=False)


def get_token(url, username):
    password = click.prompt('Password', hide_input=True)
    payload = {'username': username, 'password': password}
    r = requests.post(url + '/login', json=payload)
    r.raise_for_status()
    return r.json()['token']


def send_message(url, token, message):
    payload = {'message': message}
    headers = {'Authorization': token}
    r = requests.post(url + '/messages', json=payload, headers=headers)
    r.raise_for_status()


@click.command()
@click.option('--conf', '-c', default='~/.pylegomac.yml',
              help='Configuration file [default: "~/.pylegomac.yml"]')
@click.argument('message')
@click.version_option()
def pylegomac(message, conf):
    """Send message to aiolegomac server"""
    filename = os.path.expanduser(conf)
    config = get_config(filename)
    url = config['url']
    username = config['username']
    if 'token' in config:
        try:
            send_message(url, config['token'], message)
        except requests.exceptions.HTTPError as err:
            # Token no more valid
            pass
        else:
            click.echo('Message sent')
            return
    token = get_token(url, username)
    send_message(url, token, message)
    config['token'] = token
    save_config(filename, config)


if __name__ == '__main__':
    pylegomac()
Let's first create a configuration file:
$ cat ~/.pylegomac.yml
url: https://myhost.example.com
username: john
Send a message:
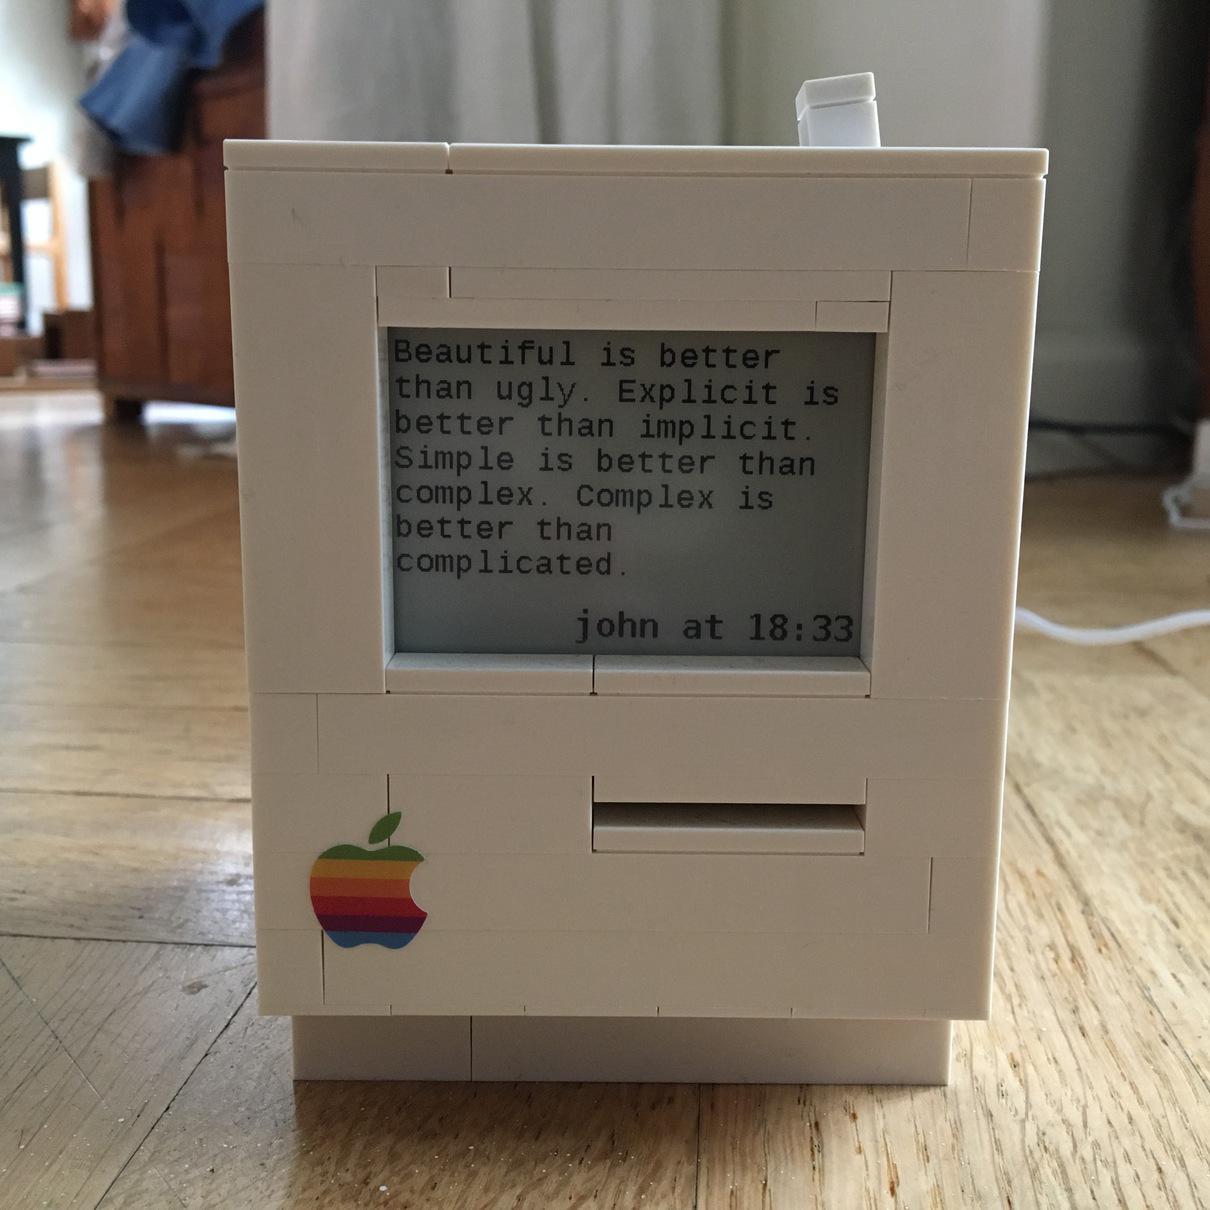
$ python pylegomac.py 'Beautiful is better than ugly. Explicit is better than implicit. Simple is better than complex. Complex is better than complicated.'
Password:
Message sent
Sending a new message won't request the password as the token was saved in the config file.
Conclusion
I have a nice little aiohttp server running on my Raspberry Pi that can receive and display messages. asyncio is quite pleasant to work with. I really like the async/await syntax.
All the code is on github:
aiolegomac (the server and client script)
legomac (the Ansible playbook to deploy the server)
Why did I only write a command line script to send messages and no web interface? Don't worry, that's planned! I could have used Jinja2. But I'd like to try a javascript framework. So that will be the subject of another post.
Comments
Comments powered by Disqus