Running your application over HTTPS with traefik

I just read another very clear article from Miguel Grinberg about Running Your Flask Application Over HTTPS.

As the title suggests, it describes different ways to run a flask application over HTTPS. I have been using flask for quite some time, but I didn't even know about the ssl_context argument. You should definitively check his article!

Using nginx as a reverse proxy with a self-signed certificate or Let’s Encrypt are two options I have been using in the past.

If your app is available on the internet, you should definitively use Let's Encrypt. But if your app is only supposed to be used internally on a private network, a self-signed certificate is an option.

Traefik

I now often use docker to deploy my applications. I was looking for a way to automatically configure Let's Encrypt. I initially found nginx-proxy and docker-letsencrypt-nginx-proxy-companion. This was interesting but wasn't that straight forward to setup.

I then discovered traefik: "a modern HTTP reverse proxy and load balancer made to deploy microservices with ease". And that's really the case! I've used it to deploy several applications and I was impressed. It's written in go, so single binary. There is also a tiny docker image that makes it easy to deploy. It includes Let's Encrypt support (with automatic renewal), websocket support (no specific setup required)... And many other features.

Here is a traefik.toml configuration example:

defaultEntryPoints = ["http", "https"]

[web]
# Port for the status page
address = ":8080"

# Entrypoints, http and https
[entryPoints]
  # http should be redirected to https
  [entryPoints.http]
  address = ":80"
    [entryPoints.http.redirect]
    entryPoint = "https"
  # https is the default
  [entryPoints.https]
  address = ":443"
    [entryPoints.https.tls]

# Enable ACME (Let's Encrypt): automatic SSL
[acme]
# Email address used for registration
email = "test@traefik.io"
storageFile = "/etc/traefik/acme/acme.json"
entryPoint = "https"
onDemand = false
OnHostRule = true
  # Use a HTTP-01 acme challenge rather than TLS-SNI-01 challenge
  [acme.httpChallenge]
  entryPoint = "http"

# Enable Docker configuration backend
[docker]
endpoint = "unix:///var/run/docker.sock"
domain = "example.com"
watch = true
exposedbydefault = false

With this simple configuration, you get:

  • HTTP redirect on HTTPS

  • Let's Encrypt support

  • Docker backend support

UPDATE (2018-03-04): as mentioned by @jackminardi in the comments, Let's Encrypt disabled the TLS-SNI challenges for most new issuance. Traefik added support for the HTTP-01 challenge. I updated the above configuration to use this validation method: [acme.httpChallenge].

A simple example

I created a dummy example just to show how to run a flask application over HTTPS with traefik and Let's Encrypt. Note that traefik is made to dynamically discover backends. So you usually don't run it with your app in the same docker-compose.yml file. It usually runs separately. But to make it easier, I put both in the same file:

version: '2'
services:
  flask:
    build: ./flask
    image: flask
    command: uwsgi --http-socket 0.0.0.0:5000 --wsgi-file app.py --callable app
    labels:
      - "traefik.enable=true"
      - "traefik.backend=flask"
      - "traefik.frontend.rule=${TRAEFIK_FRONTEND_RULE}"
  traefik:
    image: traefik
    volumes:
      - /var/run/docker.sock:/var/run/docker.sock:ro
      - ./traefik/traefik.toml:/etc/traefik/traefik.toml:ro
      - ./traefik/acme:/etc/traefik/acme
    ports:
     - "80:80"
     - "443:443"
     - "8080:8080"

Traefik requires access to the docker socket to listen for changes in the backends. It can thus automatically discover when you start and stop containers. You can ovverride default behaviour by using labels in your container.

Supposing you own the myhost.example.com domain and have access to ports 80 and 443 (you can setup port forwarding if you run that on your machine behind a router at home), you can run:

$ git clone https://github.com/beenje/flask_traefik_letsencrypt.git
$ cd flask_traefik_letsencrypt
$ export TRAEFIK_FRONTEND_RULE=Host:myhost.example.com
$ docker-compose up

Voilà! Our flask app is available over HTTPS with a real SSL certificate!

/images/flask_traefik/hello_world.png

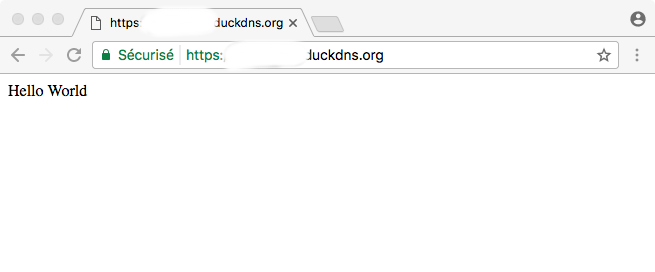
Traefik discovered the flask docker container and requested a certificate for our domain. All that automatically!

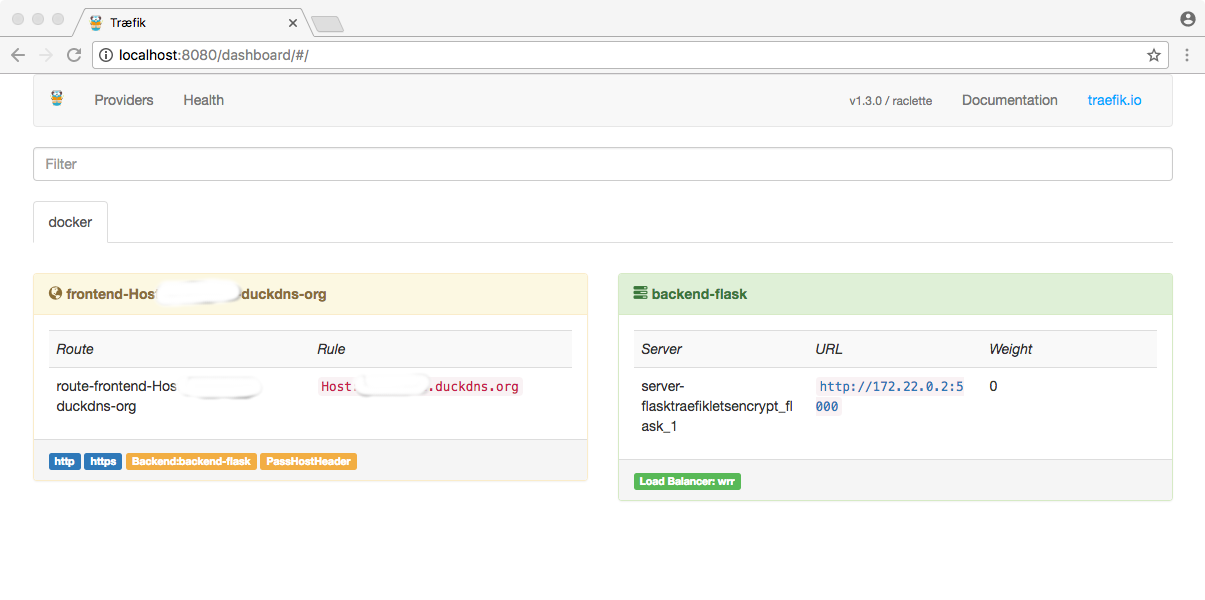
Traefik even comes with a nice dashboard:

/images/flask_traefik/traefik_dashboard.png

With this simple configuration, Qualys SSL Labs gave me an A rating :-)

/images/flask_traefik/traefik_ssl_report.png

Not as good as the A+ for Miguel's site, but not that bad! Especially considering there isn't any specific SSL setup.

A more realistic deployment

As I already mentioned, traefik is made to automatically discover backends (docker containers in my case). So you usually run it by itself.

Here is an example how it can be deployed using Ansible:

---
- name: create traefik directories
  file:
    path: /etc/traefik/acme
    state: directory
    owner: root
    group: root
    mode: 0755

- name: create traefik.toml
  template:
    src: traefik.toml.j2
    dest: /etc/traefik/traefik.toml
    owner: root
    group: root
    mode: 0644
  notify:
    - restart traefik

- name: create traefik network
  docker_network:
    name: "{{traefik_network}}"
    state: present

- name: launch traefik container with letsencrypt support
  docker_container:
    name: traefik_proxy
    image: "traefik:{{traefik_version}}"
    state: started
    restart_policy: always
    ports:
      - "80:80"
      - "443:443"
      - "{{traefik_dashboard_port}}:8080"
    volumes:
      - /etc/traefik/traefik.toml:/etc/traefik/traefik.toml:ro
      - /etc/traefik/acme:/etc/traefik/acme:rw
      - /var/run/docker.sock:/var/run/docker.sock:ro
    # purge networks so that the container is only part of
    # {{traefik_network}} (and not the default bridge network)
    purge_networks: yes
    networks:
      - name: "{{traefik_network}}"

- name: force all notified handlers to run
  meta: flush_handlers

Nothing strange here. It's quite similar to what we had in our docker-compose.yml file. We created a specific traefik_network. Our docker containers will have to be on that same network.

Here is how we could deploy a flask application on the same server using another ansible role:

- name: launch flask container
  docker_container:
    name: flask
    image: flask
    command: uwsgi --http-socket 0.0.0.0:5000 --wsgi-file app.py --callable app
    state: started
    restart_policy: always
    purge_networks: yes
    networks:
      - name: "{{traefik_network}}"
    labels:
      traefik.enable: "true"
      traefik.backend: "flask"
      traefik.frontend.rule: "Host:myhost.example.com"
      traefik.port: "5000"

We make sure the container is on the same network as the traefik proxy. Note that the traefik.port label is only required if the container exposes multiple ports. It's thus not needed in our example.

That's basically it. As you can see, docker and Ansible make the deployment easy. And traefik takes care of the Let's Encrypt certificate.

Conclusion

Traefik comes with many other features and is well documented. You should check this Docker example that demonstrates load-balancing. Really cool.

If you use docker, you should really give traefik a try!

My LEGO Macintosh Classic with Raspberry Pi and e-paper display

UPDATED 2019-11-24

Beginning of April I read an inspiring blog post from Jannis Hermanns about a LEGO Machintosh Classic with e-paper display. It was a really nice and cool article.

I've been playing with some Raspberry Pis before but only with software. I have been willing to fiddle with hardware for some time. This was the perfect opportunity!

LEGO Digital Designer

I decided to try to make my own LEGO Macintosh based on Jannis work. His blog post is quite detailed with even a list of links with all the required components.

But I quickly realized there were no LEGO building instructions... I thus created my own using LEGO Digital Designer, which was fun. Looking at the pictures on Jannis flickr album helped a lot. But having an exact idea of the screen size wasn't easy on the computer. So I also built a small prototype of the front part to get a better idea. For that I had to wait for my e-paper display.

One modification I wanted to do was to use 1U width lego on the side of the display to require less drilling. I also wanted to check if it was possible to use the button located on top of the display.

My .lxf file is on github.

/images/legomac/legomac_ldd.thumbnail.png

E-paper display

When I was about to order the 2.7 inch e-paper display from Embedded Artists, I noticed that Embedded Artists was located in Malmö, where I live :-).

I e-mailed them and I was granted to pick up my order at their office! A big thanks to them!

Raspbery Pi Zero W

The Raspberry Pi Zero W comes with Wifi which is really nice. It does not come with the soldered GPIO header. I was starting to look at existing soldering iron when I discovered this GPIO Hammer Header:

/images/legomac/gpio_hammer_header.thumbnail.jpg

No soldering required! I used the installation jig and it was really easy to install. There is a nice video that explains how to proceed:

Connecting the display to the Pi

Based on Jannis article I initially thought it wasn't possible to use a ribbon cable (due to space), so I ordered some Jumper Wires. I connected the display to the Pi using the serial expansion connector as described in his blog post. It worked. With the demo from embeddedartists, I managed to display a nice cat picture :-)

/images/legomac/jumper_wires.thumbnail.jpg /images/legomac/cat.thumbnail.jpg

I then realized that the serial expansion connector didn't give access to the button on top of the display. That button could allow some interactions, like changing mode, which would be nice. According to my prototype with 1U width lego on the side, using a ribbon cable shouldn't actually be an issue. So I ordered a Downgrade GPIO Ribbon Cable for Raspberry Pi.

It required a little drilling on the right side for the cable to fit. But not that much. More is needed on the left side to center the screen. Carried away by my enthusiasm, I actually cut a bit too much on the left side (using the dremel was fun :-).

/images/legomac/drilling_left.thumbnail.jpg /images/legomac/drilling_right.thumbnail.jpg

Everything fitted nicely in the lego case:

/images/legomac/ribbon_cable.thumbnail.jpg

Button on top

With the ribbon cable, the button on top of the display is connected to pin 15 on the Raspberry Pi (BCM GPIO22). The ImageDemoButton.py part of the demo shows an example how to use the button to change the image displayed.

Using my small prototype, I planned a small hole on top of the case. I thought I'd have to fill the brick with something hard to press the button. The 1x1 brick ended fitting perfectly. As shown on the picture below, the side is exactly on top of the button. I added a little piece of foam inside the brick to keep it straight.

/images/legomac/button_front.thumbnail.jpg

Of course I move away from the Macintosh Classic design here... but practicality beats purity :-)

Pi configuration

Jannis article made me discover resin.io, which is a really interesting project. I did a few tests on a Raspberry Pi 3 and it was a nice experience. But when I received my Pi Zero W, it wasn't supported by resinOS yet... This isn't the case anymore! Version 2.0.3 added support for the wifi chip.

Anyway, as Jannis already wrote about resinOS, I'll describe my tests with Raspbian. To flash the SD card, I recommend Etcher which is an open source project by the same resin.io. I'm more a command line guy and I have used dd many times. But I was pleasantly surprised. It's easy to install and use.

  1. Download and install Etcher

  2. Download Raspbian Buster Lite image

  3. Flash the SD card using Etcher

  4. Mount the SD card to configure it:

# Go to the boot partition
# This is an example on OSX (mount point will be different on Linux)
$ cd /Volumes/boot

# To enable ssh, create a file named ssh onto the boot partition
$ touch ssh

# Create the file wpa_supplicant.conf with your wifi settings
# Note that for Raspbian Stretch and Buster, you need the first line
# (ctrl_interface...)! This was not the case for Jessie.
$  cat << EOF > wpa_supplicant.conf
ctrl_interface=DIR=/var/run/wpa_supplicant GROUP=netdev
network={
    ssid="MyWifiNetwork"
    psk="password"
    key_mgmt=WPA-PSK
}
EOF

# Uncomment dtparam=spi=on to enable the SPI master driver
$ vi config.txt

# Leave the boot partition
$ cd
  1. Unmount the SD card and put it in the Raspberry Pi

  2. Boot the Pi

I wrote a small Ansible playbook to install the E-ink driver and the clock demo:

- name: install required dependencies
  apt:
    name:
      - git
      - libfuse-dev
      - fonts-liberation
      - python-pil
    state: present
    update_cache: yes

- name: check if the epd-fuse service exists
  command: systemctl status epd-fuse.service
  check_mode: no
  failed_when: False
  changed_when: False
  register: epd_fuse_service

- name: clone the embeddedartists gratis repository
  git:
    repo: https://github.com/embeddedartists/gratis.git
    version: 9b7accc68db23865935b0d90c77a33055483b290
    dest: /home/pi/gratis

- name: build the EPD driver and install the epd-fuse service
  shell: >
    COG_VERSION=V2 make rpi-epd_fuse &&
    COG_VERSION=V2 make rpi-install
  args:
    chdir: /home/pi/gratis/PlatformWithOS
  when: epd_fuse_service.rc != 0

- name: ensure the epd-fuse service is enabled and started
  service:
    name: epd-fuse
    state: started
    enabled: yes

- name: install the epd-clock service
  copy:
    src: epd-clock.service
    dest: /etc/systemd/system/epd-clock.service
    owner: root
    group: root
    mode: 0644

- name: start and enable epd-clock service
  systemd:
    name: epd-clock.service
    daemon_reload: yes
    state: started
    enabled: yes

Note that commit 282e88f in embeddedartists/gratis repository added support for the RaspberryPi 3, but broke the PI Zero W. You currently have to use the commit 9b7accc68 if you have a PI Zero W.

To run the playbook, clone the repository https://github.com/beenje/legomac:

$ git clone https://github.com/beenje/legomac.git
$ cd legomac
$ ansible-playbook -i hosts -k epd-demo.yml

That's it!

Of course don't forget to change the default password on your Pi.

One more thing

There isn't much Python in this article but the Pi is running some Python code. I couldn't resist putting a Talk Python To Me sticker on the back :-) It's really a great podcast and you should definitevely give it a try if you haven't yet. Thanks again to @mkennedy for the stickers!

/images/legomac/talkpythontome.thumbnail.jpg

Below are a few pictures. You can see more on flickr.

Next

I didn't build this LEGO Macintosh to use it as a simple clock :-) I have a few ideas. I'll start with a small web server so that I can receive and display messages. That will be the subject of another blog post!

Dockerfile anti-patterns and best practices

I've been using Docker for some time now. There is already a lot of documentation available online but I recently saw the same "anti-patterns" several times, so I thought it was worth writing a post about it.

I won't repeat all the Best practices for writing Dockerfiles here. You should definitively read that page.

I want to emphasize some things that took me some time to understand.

Avoid invalidating the cache

Let's take a simple example with a Python application:

FROM python:3.6

COPY . /app
WORKDIR /app

RUN pip install -r requirements.txt

ENTRYPOINT ["python"]
CMD ["ap.py"]

It's actually an example I have seen several times online. This looks fine, right?

The problem is that the COPY . /app command will invalidate the cache as soon as any file in the current directory is updated. Let's say you just change the README file and run docker build again. Docker will have to re-install all the requirements because the RUN pip command is run after the COPY that invalidated the cache.

The requirements should only be re-installed if the requirements.txt file changes:

FROM python:3.6

WORKDIR /app

COPY requirements.txt /app/requirements.txt
RUN pip install -r requirements.txt

COPY . /app

ENTRYPOINT ["python"]
CMD ["ap.py"]

With this Dockerfile, the RUN pip command will only be re-run when the requirements.txt file changes. It will use the cache otherwise.

This is much more efficient and will save you quite some time if you have many requirements to install.

Minimize the number of layers

What does that really mean?

Each Docker image references a list of read-only layers that represent filesystem differences. Every command in your Dockerfile will create a new layer.

Let's use the following Dockerfile:

FROM centos:7

RUN yum update -y
RUN yum install -y sudo
RUN yum install -y git
RUN yum clean all

Build the docker image and check the layers created with the docker history command:

$ docker build -t centos-test .
...
$ docker images
REPOSITORY                       TAG                 IMAGE ID            CREATED              SIZE
centos-test                      latest              1fae366a2613        About a minute ago   470 MB
centos                           7                   98d35105a391        24 hours ago         193 MB
$ docker history centos-test
IMAGE               CREATED             CREATED BY                                      SIZE                COMMENT
1fae366a2613        2 minutes ago       /bin/sh -c yum clean all                        1.67 MB
999e7c7c0e14        2 minutes ago       /bin/sh -c yum install -y git                   133 MB
c97b66528792        3 minutes ago       /bin/sh -c yum install -y sudo                  81 MB
e0c7b450b7a8        3 minutes ago       /bin/sh -c yum update -y                        62.5 MB
98d35105a391        24 hours ago        /bin/sh -c #(nop)  CMD ["/bin/bash"]            0 B
<missing>           24 hours ago        /bin/sh -c #(nop)  LABEL name=CentOS Base ...   0 B
<missing>           24 hours ago        /bin/sh -c #(nop) ADD file:29f66b8b4bafd0f...   193 MB
<missing>           6 months ago        /bin/sh -c #(nop)  MAINTAINER https://gith...   0 B

There are two problems with this Dockerfile:

  1. We added too many layers for nothing.

  2. The yum clean all command is meant to reduce the size of the image but it actually does the opposite by adding a new layer!

Let's check that by removing the latest command and running the build again:

FROM centos:7

RUN yum update -y
RUN yum install -y sudo
RUN yum install -y git
# RUN yum clean all
$ docker build -t centos-test .
...
$ docker images
REPOSITORY                       TAG                 IMAGE ID            CREATED             SIZE
centos-test                      latest              999e7c7c0e14        11 minutes ago      469 MB
centos                           7                   98d35105a391        24 hours ago        193 MB

The new image without the yum clean all command is indeed smaller than the previous image (1.67 MB smaller)!

If you want to remove files, it's important to do that in the same RUN command that created those files. Otherwise there is no point.

Here is the proper way to do it:

FROM centos:7

RUN yum update -y \
  && yum install -y \
  sudo \
  git \
  && yum clean all

Let's build this new image:

$ docker build -t centos-test .
...
$ docker images
REPOSITORY                       TAG                 IMAGE ID            CREATED             SIZE
centos-test                      latest              54a328ef7efd        21 seconds ago      265 MB
centos                           7                   98d35105a391        24 hours ago        193 MB
$ docker history centos-test
IMAGE               CREATED              CREATED BY                                      SIZE                COMMENT
54a328ef7efd        About a minute ago   /bin/sh -c yum update -y   && yum install ...   72.8 MB
98d35105a391        24 hours ago         /bin/sh -c #(nop)  CMD ["/bin/bash"]            0 B
<missing>           24 hours ago         /bin/sh -c #(nop)  LABEL name=CentOS Base ...   0 B
<missing>           24 hours ago         /bin/sh -c #(nop) ADD file:29f66b8b4bafd0f...   193 MB
<missing>           6 months ago         /bin/sh -c #(nop)  MAINTAINER https://gith...   0 B

The new image is only 265 MB compared to the 470 MB of the original image. There isn't much more to say :-)

If you want to know more about images and layers, you should read the documentation: Understand images, containers, and storage drivers.

Conclusion

Avoid invalidating the cache:

  • start your Dockerfile with commands that should not change often

  • put commands that can often invalidate the cache (like COPY .) as late as possible

  • only add the needed files (use a .dockerignore file)

Minimize the number of layers:

  • put related commands in the same RUN instruction

  • remove files in the same RUN command that created them

Control your accessories from Home Assistant with Siri and HomeKit

While reading more about Home Assistant, I discovered it was possible to control your accessories from Home Assistant with Siri and HomeKit. I decided to give that a try.

This requires to install Homebridge and the homebridge-homeassitant plugin.

Install Homebridge

Homebridge is a lightweight NodeJS server that emulates the iOS HomeKit API. Let's install it in the same LXC container as Home Assistant:

root@turris:~# lxc-attach -n homeassistant

I followed the Running HomeBridge on a Raspberry Pi page.

We need curl and git:

root@homeassistant:~# apt-get install -y curl git

Install Node:

root@homeassistant:~# curl -sL https://deb.nodesource.com/setup_6.x | bash -
## Installing the NodeSource Node.js v6.x repo...

## Populating apt-get cache...

root@homeassistant:~# apt-get install -y nodejs

Install avahi and other dependencies:

root@homeassistant:~# apt-get install -y libavahi-compat-libdnssd-dev

Install Homebridge and dependencies still following this page. Note that I had a strange problem here. The npm command didn't produce any output. I found the same issue on stackoverflow and even an issue on github. The workaround is just to open a new terminal...

root@homeassistant:~# npm install -g --unsafe-perm homebridge hap-nodejs node-gyp
root@homeassistant:~# cd /usr/lib/node_modules/homebridge/
root@homeassistant:/usr/lib/node_modules/homebridge# npm install --unsafe-perm bignum
root@homeassistant:/usr/lib/node_modules/homebridge# cd ../hap-nodejs/node_modules/mdns/
root@homeassistant:/usr/lib/node_modules/hap-nodejs/node_modules/mdns# node-gyp BUILDTYPE=Release rebuild

Install and configure homebridge-homeassistant plugin

root@homeassistant:/usr/lib/node_modules/hap-nodejs/node_modules/mdns# cd
root@homeassistant:~# npm install -g --unsafe-perm homebridge-homeassistant

Try to start Homebridge:

root@homeassistant:~# su -s /bin/bash homeassistant
homeassistant@homeassistant:~$ homebridge

Homebridge won't do anything until you've created a configuration file. So press CTRL-C and create the file ~/.homebridge/config.json:

homeassistant@homeassistant:~$ cat <<EOF >> ~/.homebridge/config.json
{
  "bridge": {
    "name": "Homebridge",
    "username": "CC:22:3D:E3:CE:30",
    "port": 51826,
    "pin": "031-45-154"
  },

  "platforms": [
    {
      "platform": "HomeAssistant",
      "name": "HomeAssistant",
      "host": "http://localhost:8123",
      "logging": false
    }
 ]
}
EOF

Note that you can change the username and pin code. You will need the PIN code to add the Homebridge accessory to HomeKit.

Check the Home Assistant plugin page for more information on how to configure the plugin.

Automatically start Homebridge

Let's configure systemd. Create the file /etc/systemd/system/home-assistant@homebridge.service:

root@homeassistant:~# cat <<EOF >> /etc/systemd/system/home-assistant@homebridge.service
[Unit]
Description=Node.js HomeKit Server
After=syslog.target network-online.target

[Service]
Type=simple
User=homeassistant
ExecStart=/usr/bin/homebridge -U /home/homeassistant/.homebridge
Restart=on-failure
RestartSec=10
KillMode=process

[Install]
WantedBy=multi-user.target
EOF

Enable and launch Homebridge:

root@homeassistant:~# systemctl --system daemon-reload
root@homeassistant:~# systemctl enable home-assistant@homebridge
Created symlink from /etc/systemd/system/multi-user.target.wants/home-assistant@homebridge.service to /etc/systemd/system/home-assistant@homebridge.service.
root@homeassistant:~# systemctl start home-assistant@homebridge

Adding Homebridge to iOS

Homebridge and the Home Assistant plugin are now running. Using the Home app on your iOS device, you should be able to add the accessory "Homebridge". See Homebridge README for more information. You will need to enter the PIN code defined in your config.json file.

You should then see the Homebridge bridge on your device:

/images/homebridge.png

And it will automatically add all the accessories defined in Home Assistant!

/images/home_accessories.png

You can now even use Siri to control your devices, like turning ON or OFF the TV VPN.

/images/siri_tv_vpn_off.png

Note that I renamed the original switch to make it easier to pronounce. As described in the README, avoid names usually used by Siri like "Radio" or "Sonos".

That's it! Homebridge is really a nice addition to Home Assistant if you have some iOS devices at home.

Docker and conda

I just read a blog post about Using Docker with Conda Environments. I do things slightly differently so I thought I would share an example of Dockerfile I use:

FROM continuumio/miniconda3:latest

# Install extra packages if required
RUN apt-get update && apt-get install -y \
    xxxxxx \
    && rm -rf /var/lib/apt/lists/*

# Add the user that will run the app (no need to run as root)
RUN groupadd -r myuser && useradd -r -g myuser myuser

WORKDIR /app

# Install myapp requirements
COPY environment.yml /app/environment.yml
RUN conda config --add channels conda-forge \
    && conda env create -n myapp -f environment.yml \
    && rm -rf /opt/conda/pkgs/*

# Install myapp
COPY . /app/
RUN chown -R myuser:myuser /app/*

# activate the myapp environment
ENV PATH /opt/conda/envs/myapp/bin:$PATH

I don't run source activate myapp but just use ENV to update the PATH variable. There is only one environment in the docker image. No need for the extra checks done by the activate script.

With this Dockerfile, any command will be run in the myapp environment.

Just a few additional notes:

  1. Be sure to only copy the file environment.yml before to copy the full current directory. Otherwise any change in the directory would invalidate the docker cache. We only want to re-create the conda environment if environment.yml changes.

  2. I always add the conda-forge channel. Check this post if you haven't heard of it yet.

  3. I clean some cache (/var/lib/apt/lists/ and /opt/conda/pkgs/) to make the image a bit smaller.

I switched from virtualenv to conda a while ago and I really enjoy it. A big thanks to Continuum Analytics!

Home Assistant on Turris Omnia via LXC container

In a previous post, I described how to install OpenVPN client on a Turris Omnia router. To start or stop the client, I was using the command line and mentioned the LuCi Web User Interface.

Both ways are not super easy and fast to access. A while ago, I wrote a small Flask web application to change some settings in my router. The application just allowed to click on a button to run a script via ssh on the router.

So I could write a small webapp to do just that. But I recently read about Home Assistant. It's an open-source home automation platform to track and control your devices at home. There are many components available, including Command Line Switch which looks exactly like what I need.

The Raspberry Pi is a popular device to install Home Assistant. But my Turris Omnia is quite powerful for a router with 1 GB of RAM and 8 GB of flash. It's time to use some of that power.

From what I read, there is an openWrt package of Home Assistant. I couldn't find it in the Turris Omnia available packages. Anyway, there is another feature I wanted to try: LXC Containers. Home Assistant is a Python application, so it's easy to install in a linux container and would allow to easily keep the version up-to-date.

So let's start!

Create a LXC container

As described here, you can create a LXC container via the LuCI web interface or via the command line:

root@turris:~# lxc-create -t download -n homeassistant
Setting up the GPG keyring
Downloading the image index
WARNING: Failed to download the file over HTTPs.
         The file was instead download over HTTP. A server replay attack may be possible!

 ---
 DIST  RELEASE  ARCH  VARIANT  BUILD
 ---
 Turris_OS  stable  armv7l  default  2017-01-22
 Turris_OS  stable  ppc  default  2017-01-22
 Alpine  3.4  armv7l  default  2017-01-22
 Debian  Jessie  armv7l  default  2017-01-22
 Gentoo  stable  armv7l  default  2017-01-22
 openSUSE  13.2  armv7l  default  2017-01-22
 openSUSE  42.2  armv7l  default  2017-01-22
 openSUSE  Tumbleweed  armv7l  default  2017-01-22
 Ubuntu  Xenial  armv7l  default  2017-01-22
 Ubuntu  Yakkety  armv7l  default  2017-01-22
 ---

 Distribution: Debian
 Release: Jessie
 Architecture: armv7l

 Flushing the cache...
 Downloading the image index
 Downloading the rootfs
 Downloading the metadata
 The image cache is now ready
 Unpacking the rootfs

 ---
 Distribution Debian version Jessie was just installed into your
 container.

 Content of the tarballs is provided by third party, thus there is
 no warranty of any kind.

As you can see above, I chose a Debian Jessie distribution.

Let's start and enter the container:

root@turris:~# lxc-start -n homeassistant
root@turris:~# lxc-attach -n homeassistant

Now that we are inside the container, we can first set the root password:

root@LXC_NAME:~# passwd
Enter new UNIX password:
Retype new UNIX password:
passwd: password updated successfully

LXC_NAME is not a super nice hostname. Let's update it:

root@LXC_NAME:~# hostnamectl set-hostname homeassistant
Failed to create bus connection: No such file or directory

Ok... We have to install dbus. While we are at it, let's install vim because we'll need it to edit the homeassistant configuration:

root@LXC_NAME:~# apt-get update
root@LXC_NAME:~# apt-get upgrade
root@LXC_NAME:~# apt-get install -y dbus vim

Setting the hostname now works properly:

root@LXC_NAME:~# hostnamectl set-hostname homeassistant

We can exit and enter the container again to see the change:

root@LXC_NAME:~# exit
root@turris:~# lxc-attach -n homeassistant
root@homeassistant:~#

Install Home Assistant

Next, we just have to follow the Home Assistant installation instructions. They are well detailed. I'll just quickly repeat them here to make it easier to follow but you should refer to the official page for any update:

root@homeassistant:~# apt-get install python-pip python3-dev
root@homeassistant:~# pip install --upgrade virtualenv
root@homeassistant:~# adduser --system homeassistant
root@homeassistant:~# mkdir /srv/homeassistant
root@homeassistant:~# chown homeassistant /srv/homeassistant
root@homeassistant:~# su -s /bin/bash homeassistant
homeassistant@homeassistant:/root$ virtualenv -p python3 /srv/homeassistant
homeassistant@homeassistant:/root$ source /srv/homeassistant/bin/activate
(homeassistant) homeassistant@homeassistant:/root$ pip3 install --upgrade homeassistant

Just run hass to start the application and create the default configuration:

(homeassistant) homeassistant@homeassistant:/root$ hass

Press CTRL-C to exit. Check the created configuration file: /home/homeassistant/.homeassistant/configuration.yaml.

You can comment out the introduction: line:

# Show links to resources in log and frontend
#introduction:

Add a switch to Home Assistant

To start and stop our VPN we define a Command Line Switch that triggers the openvpn script on the router. Add the following at the end of the file:

switch:
  platform: command_line
  switches:
        atv_vpn:
          command_on: 'ssh root@<router IP> "/etc/init.d/openvpn start"'
          command_off: 'ssh root@<router IP> "/etc/init.d/openvpn stop"'
          friendly_name: ATV4 VPN

The LXC container is just like another computer (a virtual one) on the local network. To access the router, we have to ssh to it. For this to work without requesting a password, we have to generate a ssh key and add the public key to the authorized_keys file on the router:

homeassistant@homeassistant:~$ ssh-keygen
Generating public/private rsa key pair.
Enter file in which to save the key (/home/homeassistant/.ssh/id_rsa):
Enter passphrase (empty for no passphrase):
Enter same passphrase again:
Your identification has been saved in /home/homeassistant/.ssh/id_rsa.
Your public key has been saved in /home/homeassistant/.ssh/id_rsa.pub.

Copy the content of /home/homeassistant/.ssh/id_rsa.pub to /root/.ssh/authorized_keys (on the router not inside the container).

With this configuration, the switch will always be off when you restart Home Assistant. It won't know either if you change the state using the command line or LuCI web interface. This can be solved by adding the optional command_state line. The command shall return a result code 0 if the switch is on. The openvpn init script on the Turris Omnia doesn't take "status" as argument. An easy way to check if openvpn is running is to use pgrep. Our new configuration becomes:

switch:
  platform: command_line
  switches:
        atv_vpn:
          command_on: 'ssh root@<router IP> "/etc/init.d/openvpn start"'
          command_off: 'ssh root@<router IP> "/etc/init.d/openvpn stop"'
          command_state: 'ssh root@<router IP> "pgrep /usr/sbin/openvpn"'
          friendly_name: ATV4 VPN

That's it. The switch state will now properly be updated even if the VPN is started or stopped without using the application.

If you go to http://<container IP>:8123, you should see something like that:

/images/hass_home.png

Automatically start Home Assistant

Let's configure systemd to automatically start the application. Create the file /etc/systemd/system/home-assistant@homeassistant.service:

root@homeassistant:~# cat <<EOF >> /etc/systemd/system/home-assistant@homeassistant.service
[Unit]
Description=Home Assistant
After=network.target

[Service]
Type=simple
User=homeassistant
ExecStart=/srv/homeassistant/bin/hass -c "/home/homeassistant/.homeassistant"

[Install]
WantedBy=multi-user.target
EOF

Enable and launch Home Assistant:

root@homeassistant:~# systemctl --system daemon-reload
root@homeassistant:~# systemctl enable home-assistant@homeassistant
Created symlink from /etc/systemd/system/multi-user.target.wants/home-assistant@homeassistant.service to /etc/systemd/system/home-assistant@homeassistant.service.
root@homeassistant:~# systemctl start home-assistant@homeassistant

You can check the logs with:

root@homeassistant:~# journalctl -f -u home-assistant@homeassistant

We just have to make sure the container starts automatically when we reboot the router. Set the following in /etc/config/lxc-auto:

root@turris:~# cat /etc/config/lxc-auto
config container
  option name homeassistant
  option timeout 60

Make it easy to access Home Assistant

There is one more thing we want to do: assign a fixed IP to the container. This can be done like for any machines on the LAN via the DHCP and DNS settings in LuCI interface. In Static Leases, assign a fixed IP to the container MAC address.

Now that the container has a fixed IP, go to http://<container IP>:8123 and create a bookmark or add an icon to your phone and tablet home screen. This makes it easy for anyone at home to turn the VPN on and off!

/images/hass_icon.png